


Making a touchscreen keyboard
Setting up your Keyman project
This is a useful convention for keeping track of your files:
- Create a folder on your hard drive for all your Keyman developer files
- In that folder, create a folder for this project, named after the language. Use all lowercase letters for compatibility with other platforms.
- Now create a project in Keyman Developer with the same name as the new folder, and save it inside the new folder
Now you will be able to use this project to organize and create any files for desktop, mobile, web or other. It also facilitates uploading the files to the Keyman website later on.
Add touch to an existing keyboard or create a new keyboard?
You can add a mobile touchscreen keyboard to an existing desktop keyboard, or you can create a new touchscreen keyboard from scratch. You should be aware that there will be cross-over between mobile and desktop keyboards. (In Keyman terms, "desktop" includes laptop computers or any device with a physical keyboard). Your mobile device can have an external keyboard, which will use the desktop Keyman keyboard. So the Keyman strategy is to always bundle touch keyboards with desktop keyboards to make them work on multiple platforms.
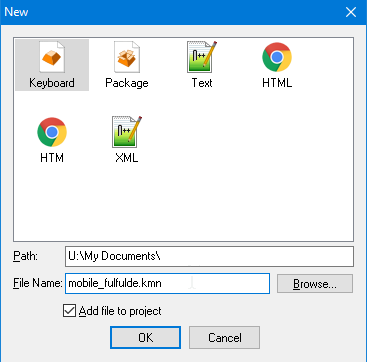
If creating from scratch, you click the New icon in the Keyman Developer toolbar (or select File > New from the menu), and specify the file name for your keyboard. We recommend a name using only lowercase letters, numbers and underscore. I’ll choose “mobile_fulfulde.kmn” .
Adding the required metadata
After creating the file, Keyman Developer will ask you to name the keyboard. This name can include spaces and upper case letters if desired. I’ll name this one “Fulfulde for Mobile”.
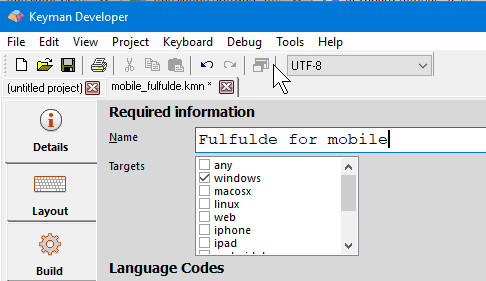
The first thing you need to do is to tell Keyman Developer this keyboard will include some kind of mobile device. You do this in the Targets list just below the keyboard name. I’ll select “mobile ” in the list, (towards the end). You see in the picture above that Keyman Developer checked the “windows” box by default, I can uncheck that or leave it checked if I am going to add a Windows keyboard to this set.
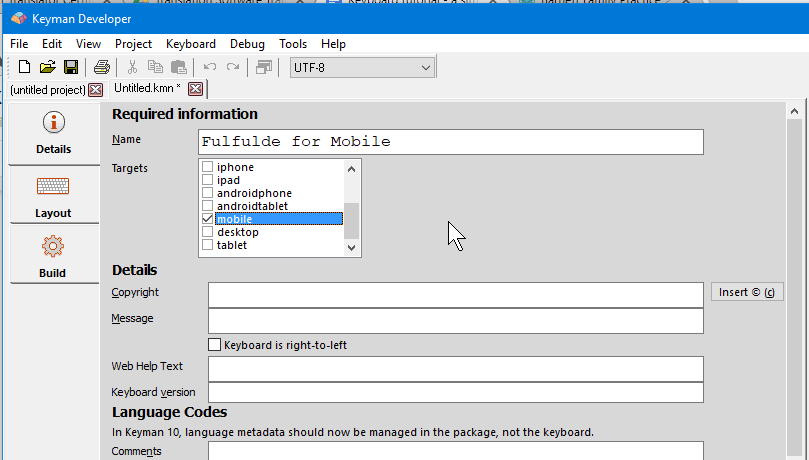
This will include all mobile devices, both Android and iOS, both phones and tablets. It is possible if needed to select Android only or iOS only if needed, and to develop a different keyboard layout for tablets than for phones, but for this example, with only a few characters needed to be added to the default keyboards, there is no need for that kind of complexity.
(If you are adding a mobile layout to an existing keyboard file, you would open that file in Keyman Developer, go to the Targets box and check “mobile” or whatever mobile targets you wanted to specify, then follow along from here).
Adding the touch optimized feature
The next step is to add the touch-optimised feature to our keyboard setup. If you scroll to the bottom of the details tab, there is the list of features to add. I’ll click the Add button and choose “touch optimised keyboard.”
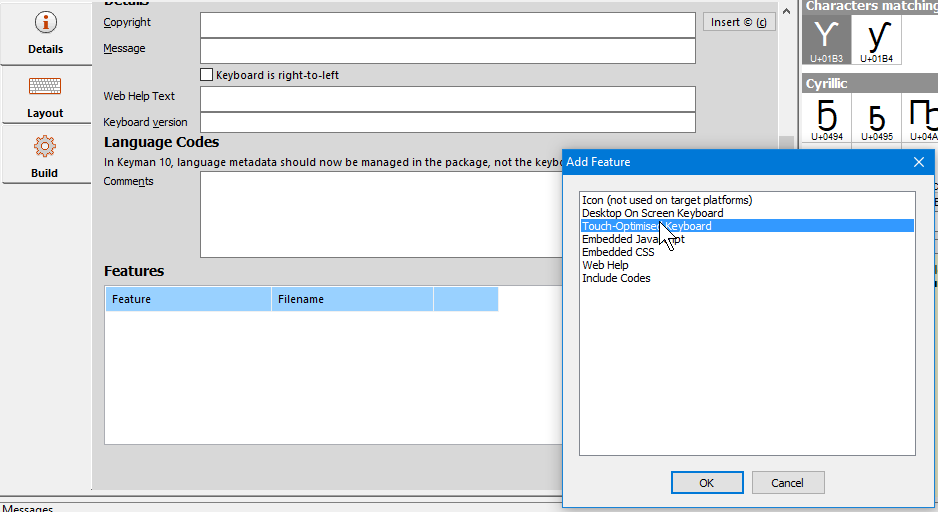
Keyman developer asks me to choose one of three templates for the mobile layout.
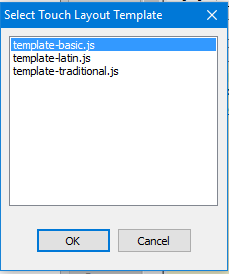
The “template-latin” layout includes many accented characters, like the default keyboards for Android and iOS do. The “template-basic” layout has no extra characters, and the template-traditional has a few extra characters (mostly punctuation symbols if you long-press period or full stop). For this example, I’ll choose “template-basic” because accented characters are not needed for Fulfulde. But if I knew that many eventual users might want to be able to type French or other European languages as well as Fulfulde, and wouldn’t like to have to switch the keyboard to do so, I could choose “template-latin”.
Defining one or several touch layouts
I select the template and click OK. Keyman Developer now adds a new tab in the left column, the Touch Layout tab.
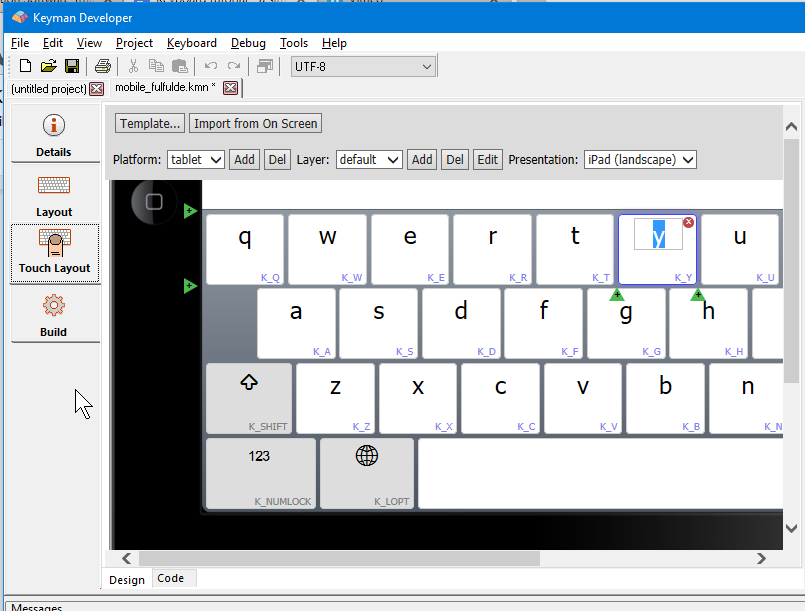
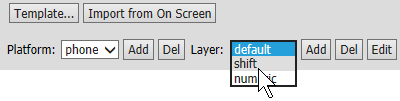
That is where we need to go now to add characters to our touch layout. But before doing that, there is one important thing to take note of in the touch layout. By default, Keyman Developer has created a layout for phones and another layout for tablets. They all start out the same, but as I add characters, I will have to make sure I add all the characters to both layouts, or I’ll discover that my keyboard does not work for all device sizes.
In the image, you see that Keyman Developer is currently showing the tablet layout. The box at top left that says “layout” is where I’d choose which layout I’d design in.

But I’m going to make this keyboard simple, and just have one layout for both tablets and phones. So beside the platform box, I am going to click the “Del” box, to delete the tablet layout. When there is only one mobile layout, Keyman Developer will compile that layout for all mobile devices. (I could also have chosen to delete the phone layout and done my layout design in the tablet layout).
Adding longpress characters
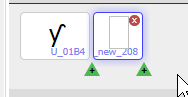
Now I can start adding characters. I’ll click on the “y” key in the layout, then I’ll look for the “add longpress popup” button at the lower left.
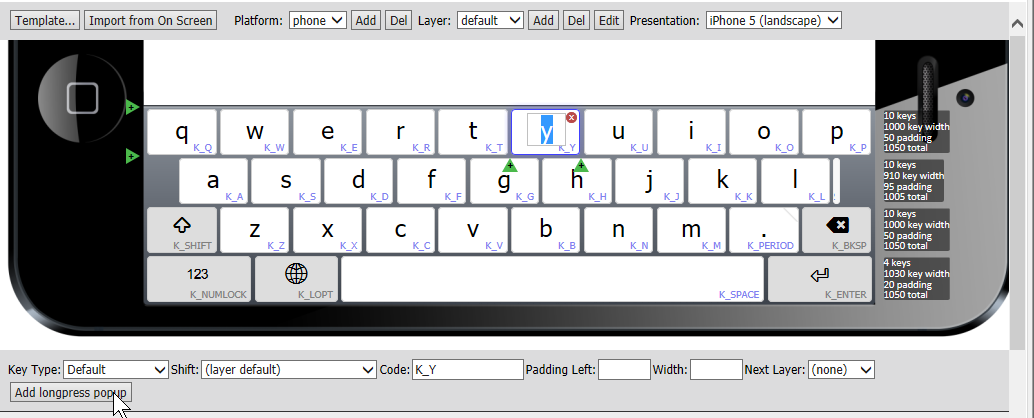
I click that, and Keyman Developer adds a new key below the keyboard layout.
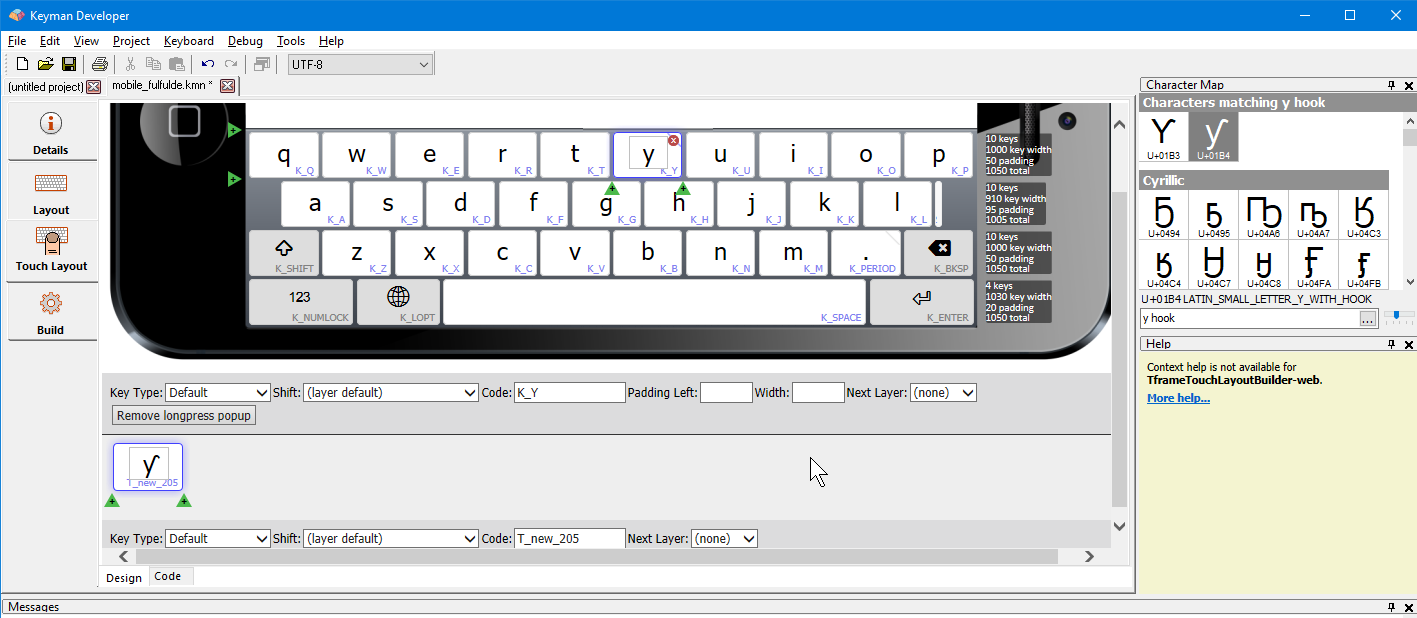
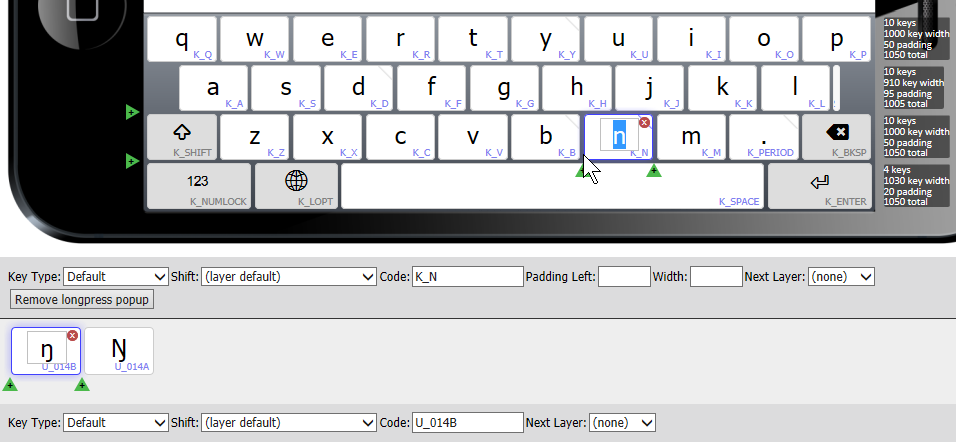
First, I need to put something in the keycap image for my new key. I’ll click inside the empty box of the new key, then I’ll go look for my y with hook character in the character map to the right. If I type “y hook” in the search box, Keyman Developer shows the character I’m looking for.
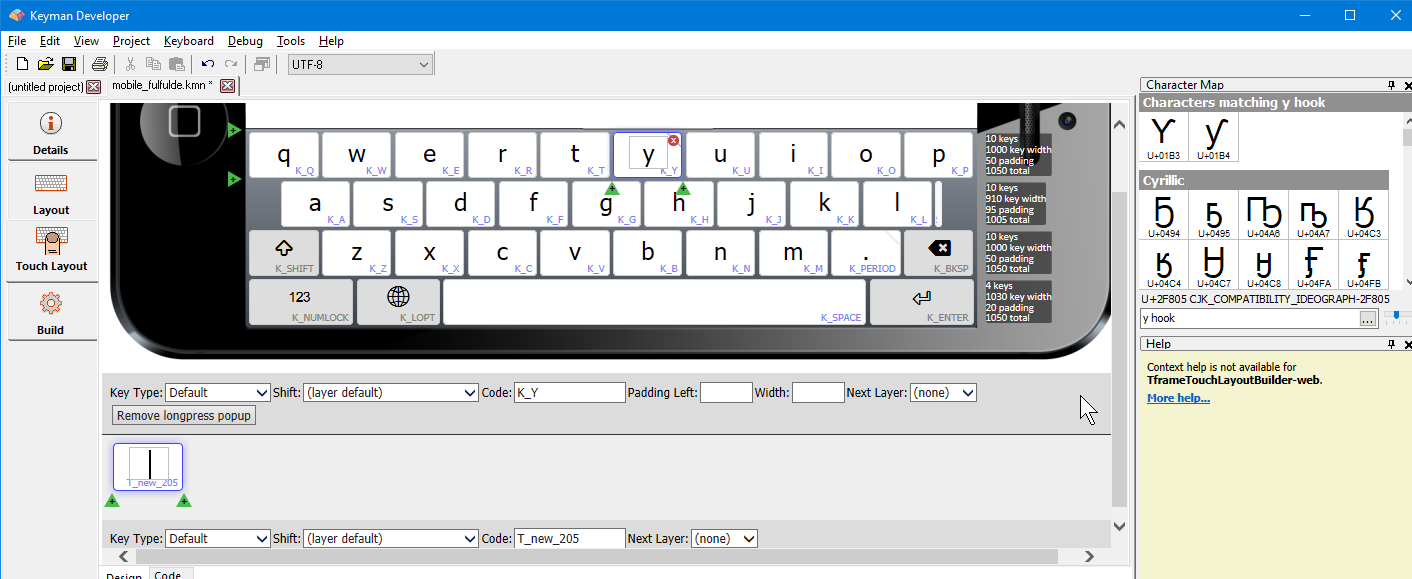
If I double click on the lower case y with hook, that adds the character to the keycap box of my new key.
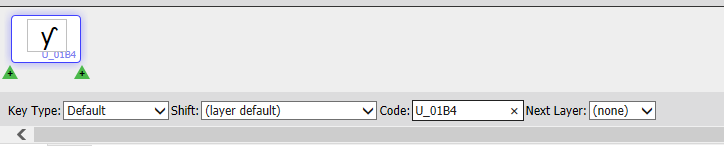
Adding the output
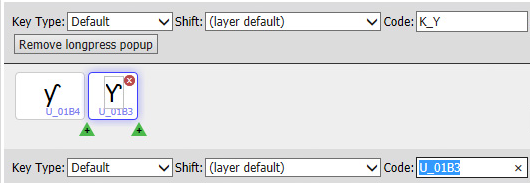
Now there is still one very important thing I need to do. If you have ever designed desktop keyboards in the layout view, you would think putting the character you want on the keycap is all you need to do. But mobile keys don’t work that way. (Technically there is a difference between a physical keyboard, where pressing a key sends a unique code to the computer, and a virtual keyboard, where tapping a key only registers a tap on an arbitrary part of the screen). In adding a mobile key, we have to enter what the key does, not just add a character to the keycap. To make our new key insert the Unicode character 01B4, I’ll go to the “code” box and change the string to “U_01B4”. (“U_” followed by a Unicode hex value is the code for “insert the character with this Unicode value”). See the Keyman Language guide on virtual keys
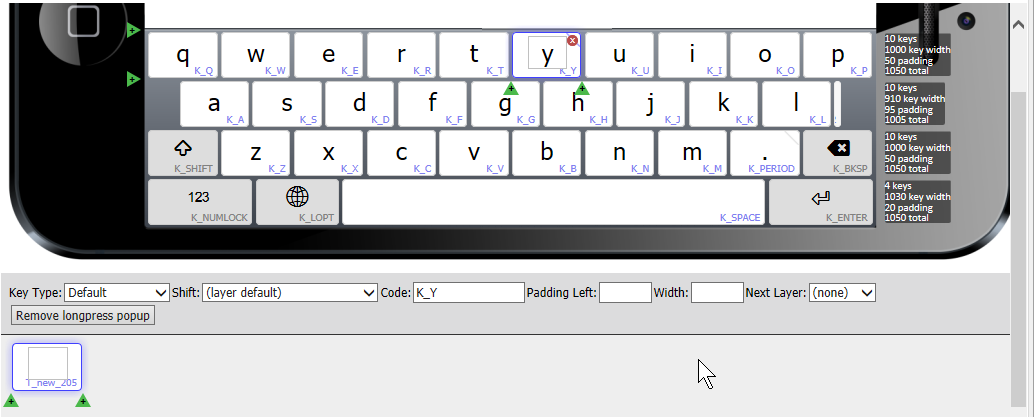
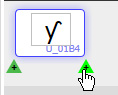
Now I can also add the upper case hook y here, so users won’t have to hold Shift before getting to an upper case y with hook. To add another new key to this longpress popup row, I click on the green triangle with a plus sign to the lower right of my new key, this adds a second new key.
(If I had clicked on the green triangle to the left of my first key, the new key would be added to the left of that key).
For this new key, I go through the same steps. I click in the empty box on the new key, then double click the upper case y with hook in the character map to put that in the keycap. I also change the code of this new key to “U_01B3”
Another option for upper case characters
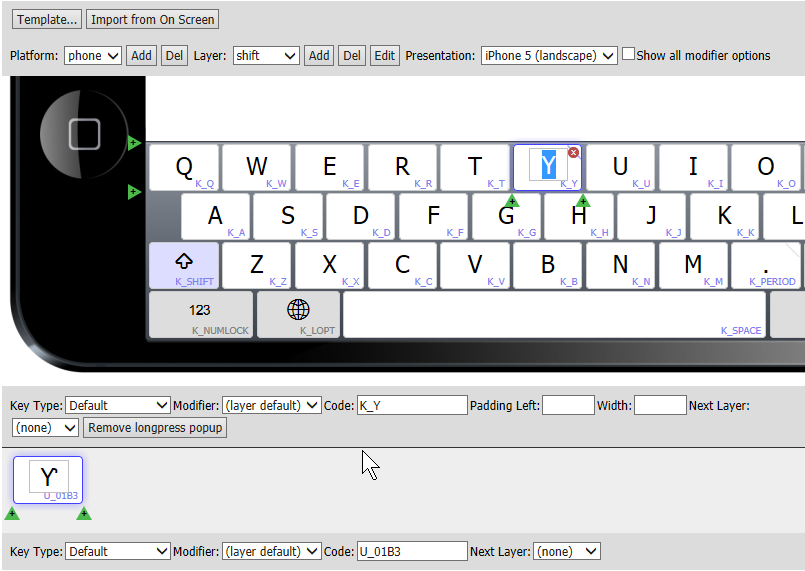
I might also add the upper case character to a longpress character on the upper-case Y key, because some users will press the Shift key then look for the letter to type. To do this, I change the layer at the top of the tablet layout to "shift" from "default".
Now I click the Y key, and add a longpress character, then add the upper case y with hook to the keycap and add the keycode as shown before.
You can design your keyboard either way, with the upper case characters in the same longpress row as the lower case, or in a longpress row off of the shift layer. The rest of this tutorial shows the upper case characters in the same row as the lower case, but I don't mean to present this as the best way. If you do put upper case characters in the shift layer, you'll have to remember to change the layer back to "default" when you want to add a lower case letter, then back to "shift" when adding an upper case letter. You could put the upper case characters in both places, if you think that best.
Now I’ll add the two d hook characters as a longpress popup for the d key. I click the d key in the layout, click “Add longpress popup”, add the lower case hook d to the keycap and change the code to “U_0257”; then click the plus sign to add a second key, add the upper case hook D to the keycap and change its code to “U_018A”. The end result should look like this:

I’ll do the similar step to add two characters as a longpress popup for “b”

And two characters as a longpress popup for “n”. (Tip, to search for ŋ in the character map, type “eng”).
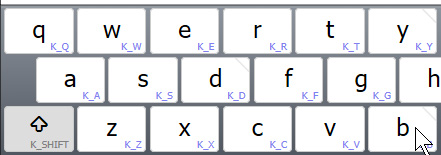
When no keys are selected in the keyboard layout, I can still see which ones I have set up longpress popups for, because Keyman Developer shows a faint gray line at the top right corner of the key. So you should have a faint diagonal line on your y, d, b and n keys.
Replacing the Unicode and Code automatically
- Hold the Ctrl key while dragging and dropping a character from the Character Map to the touch layout editor, and it will replace the Code as well as the character.
- Hold the Shift key while dropping, and it will only add the character to the key.
- Finally, hold Ctrl+Shift, this will add the character to the key AND update the Code to match the full set of characters represented on the key.
Compiling your keyboard
Now click Save to save your work, and compile the keyboard. (Keyboard > Compile Keyboard, or press F7). Hopefully you’ll see it compiled with no error messages:

If you see a warning like:
***Warning: line 0 warning 2092: Key " T_new_579" on layer "default", platform "phone", is a custom key but has no corresponding rule in the source.***This shows you forgot to enter the correct keycode for a new key you added. Double check your longpress popup keys for one with a “T_new_NNN” code, and add in the desired “U_NNNN” code.
You might also see a message like
***Error: line 0 error 405A: Key " U+0181" on "phone", layer "default" has an invalid identifier.***This shows you attempted to change the keycode but mistyped the code.
I’ve gotten this more than once, because I am used to typing U+0181to
refer to a Unicode value, but the correct syntax for a keycode in Keyman
Developer is U_0181
Testing your keyboard
Other Keyman help pages describe how you can test your keyboard:
- On a virtual device in the Chrome web browser on your computer
- On your own device accessing the keyboard over the network
If your device cannot connect to your computer on the local network (for instance if your computer is on a wired office network and your device is on the wireless office network), the above technique for sharing may not work. You can put your keyboard in a package and share it over the Internet with your device, as described below.
Packaging and distributing your keyboard
Another Keyman help file describes how to build a package file.
BCP 47 tags for Fulfulde
Step 3 of the package building tutorial describes adding the BCP 47 language tag to your package. When I came to the step of adding a tag for Fulfulde, I had to do some research. I naively thought "Fulfulde" was a clear enough label for the language. It is not, since it is a language chain rather than one language. The BCP 47 tag in many cases is the same as the SIL Ethnologue code, so that is where I had to go to find the tags I needed. In the end I added four tags for four Fulfulde languages:
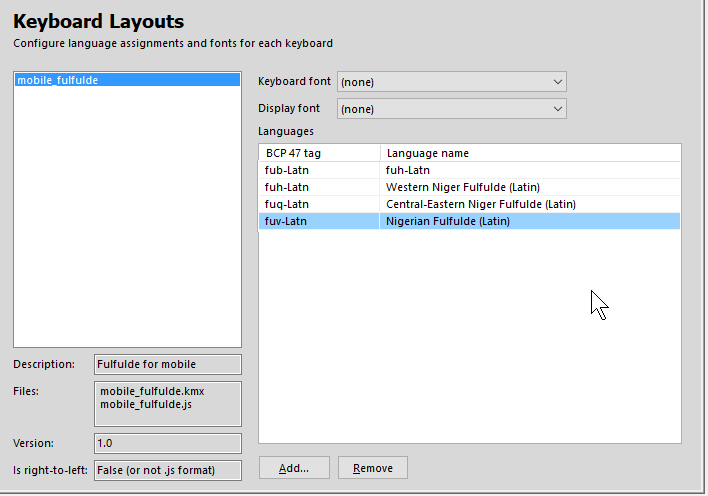
I also added the script designator Latn for Latin script. This is
recommended for Windows, which sometimes fails to install the desktop
keyboard if there is not a script designator on the BCP 47 tag. We
recommend that you always put in the script tag unless there is a
specific reason not to.
Some languages have only two letters in their BCP 47 tag. For instance,
the Hausa language has an Ethnologue code hau but the BCP 47 tag is
ha. Keyman Developer knows about this, and will change the tag to ha
if I put in the Ethnologue tag.
Next steps
The two following articles on Amharic describe a more complex touchscreen example where quite frequently two keys are pressed to get one distinct character. (Amharic is a Abugida or syllabary script, where one character can represent a consonant and following vowel).