


Creating a Touch Keyboard Layout Part 2
This article will continue the guide to creating a touch keyboard layout. In particular, we'll look in more detail at how keys are arranged, just what can be specified for each key, and lastly, how this all looks in the JSON code used to define the long press layout.
Key and Key Layer Organization
There are two issues that are immediately apparent when considering key layout on touch devices.
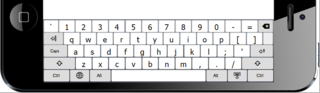
First, on smaller touch devices, such as phones, if we try to display the same arrangement of keys that is used for a typical desktop keyboard, the keys are so small that it is difficult to reliably select the wanted key. If used in 'portrait' view, key widths are too narrow for our 'fat fingers':

Or if in 'landscape' view, key heights are too small:
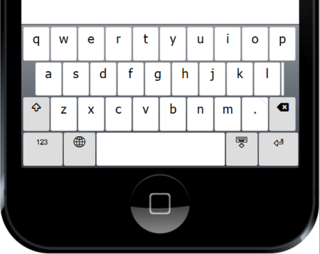
The situation is improved markedly if we limit the number of keys per row to ten and have no more than four key rows:
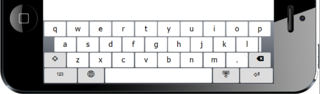
and, in landscape view:
So which keys can be eliminated, and which keys must be on the base (default) layer? This brings us to the second point. When using phones and other touch layout devices rather than desktop keyboards, text entry is most often single-handed, which makes it best to avoid using the 'shift' layer for entering normal text. Secondary keyboard layers will, of course, still be usually needed for uppercase, numerals and symbols, but will be used much less frequently.
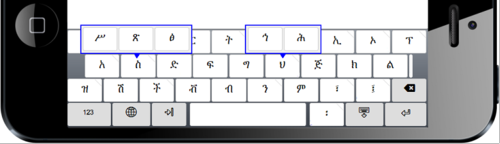
Most desktop keyboards (for European languages, at least) are already laid out with no more than ten letter (or digit) keys per row, with the remaining keys being used for accented letters, punctuation and other non-letter input. So the obvious choice is to move non-letter keys (and accented letters) either to a secondary key layer, or to long press ('pop-up') keys. The GFF Amharic desktop keyboard is fortunately also arranged with only ten letters per key row (other keys being used for punctuation, etc.), as the many different characters in the Amharic 'abugida' are generated by multi-letter sequences rather than being displayed on separate keys. The Geez script does not have both upper-case and lower-case forms, so those initial consonants that require use of the 'shift' layer on the desktop keyboard have been added to the corresponding base-layer key as long press keys:
Arrangement of punctuation and other non-letter keys is more flexible as mobile users are generally familiar with using long press keys or a secondary key layer for finding and entering digits and special characters. However, some punctuation characters are used so frequently that they need to be on the base layer. For the GFF Amharic keyboard, the most frequently used punctuation characters can be output from the base layer using standard or long press keys. The Geez word space character, in particular, is so frequently used that it was considered useful to add it to the bottom key, adjacent to the space bar, as is sometimes done for other scripts, such as Japanese, on desktop (physical) keyboards.
Arranging keys with the layout editor
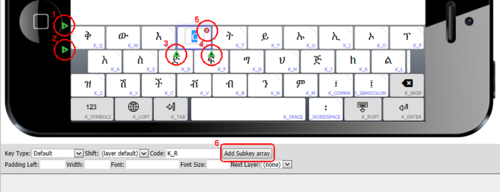
The Keyman Developer layout editor really makes it quite easy to try different key layouts and choose what is best for your keyboard. The image below highlights just how, for any selected key, using the clickable icons circled, a key row can be added above (1) or below (2), a key added before (3) or after (4), the selected key deleted (5), and how an array of long press keys (sometimes called "subkeys") can be added (6).
Key properties
For each visual key, the appearance and behaviour is determined by a number of properties:
Key code
Each key must be given an identifying key code which is unique to the key layer.
Key codes by and large correspond to the virtual key codes used when creating a
keyboard program for a desktop keyboard, and should start with K_, for keys
mapped to standard Keyman virtual key names, e.g. K_HYPHEN, and T_ or U_
for user-defined names, e.g. T_ZZZ. If keyboard rules exist matching the key
code in context, then the output from the key will be determined by the
processing of those rules. It is usually best to include explicit rules to
manage the output from each key, but if no rules matching the key code are
included in the keyboard program, and the key code matches the pattern
U_xxxx[_yyyy...] (where xxxx and
yyyy are 4 to 6-digit hex strings), then the Unicode characters
U+xxxx and U+yyyy will be output. As of Keyman 15, you
can use more than one Unicode character value in the id (earlier versions
permitted only one). The key code is always required, and a default code will
usually be generated automatically by Keyman Developer.
-
K_xxxxis used for a standard Keyman Desktop key name, e.g.K_W,K_ENTER. You cannot make up your ownK_xxxxnames. Many of theK_ids have overloaded output behaviour, for instance, if no rule is matched forK_W, Keyman will output 'w' when it is touched. The standard key names are listed in Virtual Keys and Virtual Character Keys. Typically, you would use only the "common" virtual key codes. -
T_xxxxis used for any user defined names, e.g.T_SCHWA. If you wanted to use it,T_ENTERwould also be valid. If no rule matches it, the key will have no output behaviour. -
U_####[_####]is used as a shortcut for a key that will output those Unicode values, if no rule matches it. This is similar to the overloaded behaviour forK_ids. Thus####must be valid Unicode characters. E.g.U_0259would generate a schwa if no rule matches. It is still valid to have a rule such as+ [U_0259] > ...
As noted above, some K_xxxx codes emit characters, if no rule is defined.
There are also some codes which have special functions:
| Identifier | Meaning |
|---|---|
|
|
Submit a form, or add a new line (multi-line); the key action may vary depending on the situation. |
|
|
Delete back a single character. This key, if held down, will repeat. It is the only key code which triggers repeat behavior. |
|
|
Open the language menu (aka Globe key). |
|
|
Hide the on screen keyboard. |
|
|
Move to next or previous element in a form. Note that these key functions are normally
implemented outside the touch layout, so should not typically be used. |
Any key can be used to switch keyboard layers (see
nextlayer), but the following layer-switching key codes have
been added for switching to some commonly used secondary layers. Note that these
keys have no specific meaning; you must still set the nextlayer property on
the key.
| Identifier | Meaning |
|---|---|
|
|
Switch to a numeric layer |
|
|
Switch to a symbol layer |
|
|
Switch to a currency layer |
|
|
Switch to a shift layer |
|
|
Switch to a right-alt layer (desktop compatibility) |
Key text
The key text is simply the character (or characters) that you want to appear on
the key cap. This will usually be the same as the characters generated when the
key is touched, unless contextual rules are used to generate output according to
a multi-key sequence, as will be true for the GFF Amharic keyboard. Unicode
characters can be specified either as a string using a target font or using the
standard hex notation \uxxxx. This may be sometimes more convenient, for
example, for characters from an uninstalled font, or for diacritic characters
that do not render well alone.
A number of special text labels are recognized as identifying special purpose keys, such as Shift, Backspace, Enter, etc., for which icons are more appropriately used than a text label. A special font including these icons is included with Keyman and automatically embedded and used in any web page using Keyman. The list of icons in the font will probably be extended in future, but for now the following special labels are recognized:
| Text String | Key Cap | Key Purpose |
|---|---|---|
|
|
| Select Shift layer (inactive). Use on the Shift key to indicate that it switches to the shift layer. |
|
|
| Select Shift layer (active). Use on the Shift key on the shift layer to switch back to the default layer. |
|
|
| Switch to Caps layer (inactive). Not commonly used; generally double-tap on Shift key is used to access the caps layer. |
|
|
| Switch to Caps layer (active). Use on the Shift key on the caps layer to switch back to the default layer. |
|
|
or | Return or Enter key (shape determined by writing system direction) |
|
|
| Return or Enter key (left-to-right script shape) |
|
|
| Return or Enter key (right-to-left script shape) |
|
|
or | Backspace key (shape determined by writing system direction) |
|
|
| Backspace key (left-to-right script shape) |
|
|
| Backspace key (right-to-left script shape) |
|
|
|
Globe key; display the language menu. Use on the |
|
|
|
Hide the on screen keyboard. Use on the |
|
|
| Select alphabetic layer (Uppercase) |
|
|
| Select alphabetic layer (Lowercase) |
|
|
| Select the numeric layer |
|
|
| Select the symbol layer |
|
|
| Select the currency symbol layer |
|
|
(iOS) or (Android) | Zero Width Non Joiner (shape determined by current platform) |
|
|
| Zero Width Non Joiner (iOS style shape) |
|
|
| Zero Width Non Joiner (Android style shape) |
The following additional symbols are also available, but intended for working with legacy desktop layouts, and not recommended for general use:
| Text String | Key Cap | Key Purpose |
|---|---|---|
|
|
| Move to next input element in tab order |
|
|
| Move to previous input element in tab order |
|
|
| Select caps layer (legacy) |
|
|
| Select AltGr (Right-Alt) layer (desktop layout compatibility) |
|
|
| Select Alt layer (desktop layout compatibility) |
|
|
| Select Ctrl layer (desktop layout compatibility) |
|
|
| Select Left-Alt layer (desktop layout compatibility) |
|
|
| Select Right-Alt layer (desktop layout compatibility) |
|
|
| Select Left-Ctrl layer (desktop layout compatibility) |
|
|
| Select Right-Ctrl layer (desktop layout compatibility) |
|
|
| Select Left-Alt-Ctrl layer (desktop layout compatibility) |
|
|
| Select Right-Alt-Ctrl layer (desktop layout compatibility) |
|
|
| Select Left-Alt-Ctrl-Shift layer (desktop layout compatibility) |
|
|
| Select Right-Alt-Ctrl-Shift layer (desktop layout compatibility) |
|
|
| Select Alt-Shift layer (desktop layout compatibility) |
|
|
| Select Ctrl-Shift layer (desktop layout compatibility) |
|
|
| Select Alt-Ctrl-Shift layer (desktop layout compatibility) |
|
|
| Select Left-Alt-Shift layer (desktop layout compatibility) |
|
|
| Select Right-Alt-Shift layer (desktop layout compatibility) |
|
|
| Select Left-Ctrl-Shift layer (desktop layout compatibility) |
|
|
| Select Right-Ctrl-Shift layer (desktop layout compatibility) |
Key type
The general appearance of each key is determined by the key type, which is selected (in Keyman Developer) from a drop-down list. While generally behavior is not impacted by the key type, Spacer keys cannot be selected.
| Key Type | Value | Meaning |
|---|---|---|
| Default |
|
Any normal key that emits a character |
| Special |
|
The frame keys such as Shift, Enter, BkSp. |
| Special (active) |
|
A frame key which is currently active, such as the Shift key on the shift layer. |
| Deadkey |
|
Does not impact behavior, but colors the key differently to indicate it has a special function, such as a desktop-style deadkey. |
| Blank |
|
A blank key, which may be used to maintain a layout shape. Usually colored differently. Does not impact behavior. |
| Spacer |
|
Does not render the key, but leaves a same-sized gap in its place. The key cannot be selected. |
The colour, shading and borders of each key type is actually set by a style sheet which can be customized by the page developer.
font-family
If a different font is required for a particular key text, the font-family
name can be specified. The font used to display icons for the special keys (as
mentioned above) does not need to be specified, as it will be automatically
applied to a key that uses any of the special key text labels.
font-size
If a particular key cap text requires a different font size from the default for the layout, it should be specified in em units. This can be helpful if a the key text is either an unusually large character or, alternatively, a word or string of several characters that would not normally fit on the key.
width
The layout is scaled to fit the widest row of keys in the device width, assuming a default key width of 100 units. Keys that are to be wider or narrower than the default width should have width specified as a percentage of the default width. For any key row that is narrower than the widest row, the width of the last key in the row will be automatically increased to align the right hand side of the key with the key with the right edge of the keyboard. However, where this is not wanted, a "spacer" key can be inserted to leave a visible space instead. As shown in the above layouts, where the spacer key appears on the designer screen as a narrow key, but will not be visible in actual use.
pad
Padding to the left of each key can be adjusted, and specified as a percentage of the default key width. If not specified, a standard padding of 5% of the key width is used between adjacent keys.
layer
To simplify correspondence with desktop keyboards and avoid the need for using a
separate keyboard mapping program, touch layout keys can specify a desktop
keyboard layer that the keystroke should be interpreted as coming from. Layer
names of shift, ctrl, alt, ctrlshift, altshift, ctrlalt and
ctrlaltshift can be used to simulate use of the appropriate modifier keys when
processing rules.
nextlayer
The virtual keys K_SHIFT, K_CONTROL, K_MENU, etc. are normally used to
switch to another key layer, which is implied by the key code. The left and
right variants of those key codes, and also additional layer-switching keys
mentioned above (K_NUMERALS, K_SYMBOLS, K_CURRENCIES, K_ALTGR) can also
be used to automatically switch to the appropriate key layer instead of
outputting a character. However, it is sometimes useful for a key to output a
character first, then switch to a new layer, for example, switching back to the
default keyboard layer after a punctuation key on a secondary layer had been
used. Specifying the nextlayer for a key allows a different key layer to be
selected automatically following the output of the key. Of course, that can be
manually overridden by switching to a different layer if preferred.
Another way the nextlayer property can be used is for a non-standard layer
switching key. So, for example, for the GFF Amharic keyboard phone layout,
switching back to the base layer uses a T_ALPHA key code, in which nextlayer
is set as default. In this case, it is also necessary to add a rule to the
keyboard program:
+ [T_ALPHA] > nulto ensure that the key's scan code is ignored by the keyboard mapping.
When a key in a touch layout definition includes a Next Layer control, this
takes precedence over setting layer via the
layer store (as the Next Layer
control is applied once the rule has finished processing).
subkey
Arrays of longpress 'subkeys' or pop-up keys can be defined for any key, and will appear momentarily after the key is touched if not immediately released. This provides a major advantage over physical desktop keyboards in that many more keys can be made available from a single layer, without cluttering up the basic appearance of the layout. For the GFF Amharic keyboard, we have already noted how such subkey arrays are used to manage the extra keys that, on the desktop keyboard, would appear in the shift layer. But they are also used to provide another way to enter the two different types of each syllable-initial vowels (glottal or pharyngeal), as a visual alternative to pressing the key twice.
The same properties that are defined for standard keys can also be specified for each subkey except that the width of each key in a subkey array will always be the same as the width of the key that causes the subkeys to be shown, and key spacing always uses the default padding value.
The GFF Amharic keyboard, like many others, is mnemonic, so it is useful to also display the standard key cap letter that would appear on the key of a desktop keyboard. This is enabled globally in the On-Screen layout editor and applies to both the On-Screen keyboard and touch layouts.
Representing (and editing) the visual layout with JSON code
In case you are wondering, 'Why do I need to know that?', the reason is that, just as with keyboard mapping code, it is sometimes easier to edit a text specification than to use the GUI layout design tool. Keyman Developer switches seamlessly between the visual layout tool and the code editor, unless, of course, careless editing of the code results in invalid JSON syntax!
The GFF Amharic phone layout code starts as:
  {
    "phone": {
      "font": "Tahoma",
      "layer": [{
        "id": "default",
        "row": [{
          "id": 1,
          "key": [{
              "id": "K_Q",
              "text": "ቅ",
              "pad": "0"
            }, {
              "id": "K_W",
              "text": "ው"
            },

  . . .
As long as standard JSON syntax is remembered - nested braces {…}, quoted strings "…" for both element names and values, element or object arrays in square brackets […], and no trailing comma after the last element in an array - it is quite easy to understand a layout, which will usually comprise a list of two separate JSON objects for tablet and phone.
Now you're ready to create a great touch layout for your own Keyman keyboard!
Other articles on developing touch layouts:
- Creating a touch keyboard layout for Amharic - part 1
- How to test your keyboard layout — touch and desktop
You can distribute your keyboard to other users by following the instructions in this article: