


Programmer's Guide - Advanced Keyboard Creation
Introduction
Whenever you want to do much more in a keyboard than simple character substitution, you will generally need to make use of advanced features such as stores, deadkeys, and multiple groups. The tutorial has already shown some basic usage of stores and deadkeys, but has not covered other possibilities of their use. In this topic we will examine a keyboard that demonstrates some other uses of stores and deadkeys, and introduces the use of multiple groups for complex processing.
We recommend that you read the topics on groups, stores, and deadkeys before continuing.
The keyboard we will examine is IPAMenu.kmn (found in the Keyman Developer Samples folder), which contains the beginnings of a menu-based keyboard for using the International Phonetic Alphabet (IPA). You will need a Unicode font with IPA characters (such as Lucida Sans Unicode or Code2000) to properly use this keyboard, but you should be able to follow the code even without. For more information about the IPA, see The International Phonetic Association.
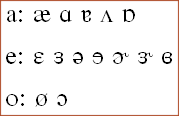
Most of the IPA glyphs are modifications of glyphs from the Latin alphabet, used to represent differing
sounds used in language. Because of this, it seemed reasonable to place all glyphs derived from "a" on the
"a" key, and so on. We have implemented a few of the vowel symbols in this keyboard:
Overview of the Keyboard
The basic operation of the keyboard is the displaying of a menu when a key is pressed, followed by the output of a single character when the user makes a selection from that menu with a number key.
The first thing to notice is the organisation of most of the input and output into stores:
store( choices ) '1234567890'
store( a_menu )  '[1 2a 3- 4- 5- 6-]'
store( e_menu )  '[1- 2- 3- 4e 5- 6- 7- 8-]'
store( o_menu )  '[1o 2- 3-]'
store( a_chars ) '�a----' dk(a_err) dk(a_err) dk(a_err) dk(a_err)
store( e_chars ) '---e----' dk(e_err) dk(e_err)
store( o_chars ) 'o--' dk(o_err) dk(o_err) dk(o_err) dk(o_err) dk(o_err) dk(o_err) dk(o_err)
An important point to notice is the use of deadkeys in these stores: this is a new feature for Keyman 6.0; we'll explain their purpose here later.
The next thing that stands out is that the file has six separate groups, four of which handle keystrokes and two which manipulate context only:
group( first )
group( main ) using keys
group( final )
group( a_group ) using keys
group( e_group ) using keys
group( o_group ) using keys
Primary Operation of the Keyboard
When a key is pressed, execution begins at the group indicated by the
begin
statement, in this case the
first
group. Because this group does not specify
using keys
, it is limited to context manipulation only: the output of this rule is dependent only on what came before the current keystroke, and becomes the context for any further groups that are called from this one.
Let's suppose the "a" key has been pressed with no context. The
first
group will have nothing to match on, so the
nomatch
rule fires and passes control to the
main
group. Here the "a" key is matched, and the
a_menu
store is output, displaying the menu of a-like characters.
Now the user is presented with a menu of options to choose from. Suppose he types "1". Once again the
first
group gains control first, but this time matches the first rule, with the
a_menu
string on the context, so control is passed to the
a_menu
group to handle the keystroke. Here the "1" is matched as an entry in the
choices
store, and the corresponding character in the
a_chars
store - in this case "�" - is output. Finally, control goes from here to the
final
group, which fails to match anything in the context (which now includes the output from the previous group).
Error Handling
One issue this keyboard has to deal with is if the user tries to select an option that's not in the menu - when this happens, it should beep and remain at the menu, so the user can try again. Also, if the user wants to dismiss the menu, we should allow the use of Backspace to delete it - this is simply done with a rule matching [K_BKSP] and outputting "nul".
There are two rules which handle the user selecting a nonexistent option: if the current menu has fewer than 10 entries, the user can press a number key indicating a menu entry that is not there - this situation will be matched by the any(choices) rule. The other occasion is if the user presses any other key which is not valid for selecting a menu option. This is handled by the nomatch rule in the group. For both these cases we want the output to be the same: a beep, and remain at the menu. To do this we will use deadkeys as error flags, one for each menu. By padding the
a_char, e_char, o_char
stores to 10 characters with these deadkeys, the output for this first situation will be the error flag. Similarly, we can output these deadkeys in the nomatch rules, to mark an error.
The actual error handling is now done with the
final
group, which matches the error flags on the output and outputs the beep and the appropriate menu again.
Conclusion
Although this example went nowhere near the limits of what can be done with multiple groups, it gave a demonstration of some of the ways multiple groups can be made to interact for more powerful processing. You should now have some understanding of the use of advanced features in Keyman Developer, and be able to begin using them to improve your keyboards.